


Table of Contents
ToggleHow to Generate ID Card with QR Code HTML CSS JS
Building an ID card generator is an excellent project for strengthening your HTML, CSS, and JavaScript skills while creating a practical web application. In this tutorial, you will learn how to develop a simple yet effective ID card generator that allows users to create personalized ID cards, generate QR codes, and download the final output with ease. Whether you are designing ID cards for events, educational purposes, or personal projects, this step-by-step guide will help you understand key front-end development concepts and enhance your web development expertise.
- HTML CODE
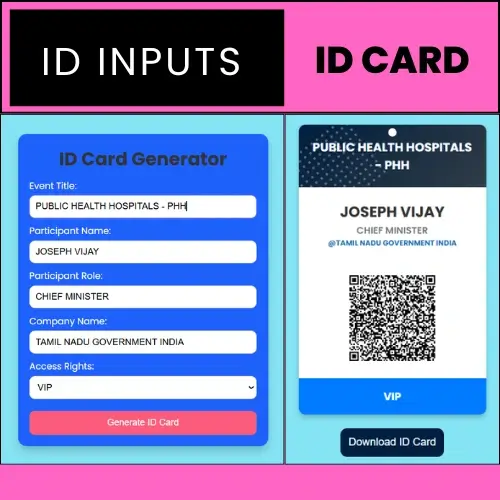
Body Section – Form Container(#formContainer): Implements a form interface for capturing ID information, including the title name, participant name, designation, company name, and access level. Upon submission, the entered data is used to generate a customized ID card.
ID Card Display(#idCard): Serves as the output section for the generated ID card, presenting the event title, participant name, designation, company name, and access rights. It also includes a dedicated QR code element (#qrcode) that is dynamically populated using the submitted form data. Download Button(#dwnCard): Triggers the download of the generated ID card, allowing users to save it locally.
JavaScript Dependencies and Libraries:
- jQuery: A widely used JavaScript library that simplifies DOM manipulation, event handling, animations, and AJAX operations, enabling cleaner and more efficient code.
- jQuery QRCode: A plugin built on top of jQuery that generates QR codes dynamically based on user-provided data, making QR code integration straightforward and efficient.
- html-to-image: A utility library that converts HTML elements into image formats such as PNG or JPEG, allowing generated badges or cards to be exported as downloadable images.
- script.js: A custom external JavaScript file that contains the application’s core logic, including user input processing, ID generation, QR code rendering, event handling, and download functionality.
<!DOCTYPE html>
<html lang="en">
<head>
    <meta charset="UTF-8">
    <meta name="viewport" content="width=device-width, initial-scale=1.0">
    <title>ID Card Generator with QR Code</title>
    <link rel="stylesheet" href="https://fonts.googleapis.com/css2?family=Poppins:wght@400;500;600;700&display=swap">
    <link rel="stylesheet" href="styles.css">
</head>
<body>
    <div id="formContainer" class="section">
        <h1>ID Card Generator</h1>
        <form id="idForm">
            <label for="eventname">Event Title:</label>
            <input type="text" id="eventTitle" required>

            <label for="name">Participant Name:</label>
            <input type="text" id="participant" required>

            <label for="designation">Participant Role:</label>
            <input type="text" id="designation" required>

            <label for="company">Company Name:</label>
            <input type="text" id="company" required>

            <label for="access">Access Rights:</label>
            <select id="rights" required>
                <option value="Attendee">Guest</option>
                <option value="VIP">VIP</option>
            </select>
            <button type="submit">Generate ID Card</button>
        </form>
    </div>

    <div id="idCard" class="idCard">
        <div class="idCard-header">
            <h1 id="idEvent"></h1>
        </div>
        <div class="idCard-body">
            <h2 id="idName"></h2>
            <p id="idDesignation"></p>
            <h3 id="idcontainer"></h3>
        </div>
        <div id="qrcode" class="idCard-qr">
        </div>
        <div class="idCard-footer">
            <p id="idRights">ATTENDEE</p>
        </div>
    </div>

    <button id="dwnCard" class="dwnCard">Download ID Card</button>

    <script src="https://cdnjs.cloudflare.com/ajax/libs/jquery/3.6.0/jquery.min.js"></script>
    <script src="https://cdnjs.cloudflare.com/ajax/libs/jquery.qrcode/1.0/jquery.qrcode.min.js"></script>
    <script src="https://cdnjs.cloudflare.com/ajax/libs/html-to-image/1.11.11/html-to-image.js"></script>
    <script src="script.js"></script>
</body>
</html>- CSS CODE
- Global Styles: Configures a light background, applies the Poppins font, and centers content using Flexbox.
- Section Container: Creates a centered card layout with a blue background, rounded corners, shadow effects, and a maximum width of 400px.
- Container Header: Styles the heading with a larger font size, zero margin, and a dark grey color scheme.
- Form Layout: Uses Flexbox for vertical alignment, with properly spaced labels and user-friendly form controls.
- Input Controls: Applies padding, rounded borders, and focus states with enhanced colors and shadow effects.
- Button Styling: Implements rounded buttons with a customize background and smooth hover transitions to blue.
- Hidden ID Card(.dwnCard): Hidden by default and styled with a dark blue theme, rounded corners and button-like aesthetics.
- Responsive Design: Optimizes layout, typography, and spacing for devices with screen widths below 600px.
- ID Card Section(.idCard): Defines a fixed-width card with rounded edges, shadow effects, and centered content alignment.
- ID Card Header(.idCard-header): Features a gradient dark background, decorative radial effects, and a centered accent element for visual enhancement.
- ID Card Body(.idCard-body): Uses a vertical Flexbox layout with structural spacing customized typography for content presentation.
- ID Card Footer(.idCard-footer): Applies a blue background, bold white text, and consistent padding to create a prominent footer section.
body {
  /*background-color: #e0e7f1;*/
  background-color: rgb(134, 228, 245);
  font-family: 'Poppins', sans-serif;
  display: flex;
  flex-direction: column;
  justify-content: center;
  align-items: center;
  min-height: 100vh;
  margin: 0;
  padding: 0;
}

.section {
  background-color: #1f61fb;
  padding: 20px;
  border-radius: 15px;
  box-shadow: 0 8px 16px rgba(0, 0, 0, 0.2);
  width: 100%;
  max-width: 400px;
  text-align: center;
}

.section h1 {
  margin: 0px;
  font-size: 2em;
  color: #333;
}

form {
  display: flex;
  flex-direction: column;
}

label {
  margin-top: 10px;
  margin-bottom: 5px;
  font-size: 1em;
  color:rgb(254, 251, 251);
  text-align: left;
}

input[type="text"],
select {
  padding: 10px;
  border-radius: 10px;
  border: 1px solid #ccc;
  font-size: 1em;
  outline: none;
  transition: all 0.3s;
  width: 100%;
  box-sizing: border-box;
}

input[type="text"]:focus,
select:focus {
  border-color: #6A82FB;
  box-shadow: 0 0 5px rgba(106, 130, 251, 0.5);
}

.section button {
  margin-top: 20px;
  padding: 12px;
  background: #FC5C7D;
  border: none;
  border-radius: 10px;
  color: white;
  font-size: 1em;
  cursor: pointer;
  transition: background 0.3s;
  width: 100%;
}

.section button:hover {
  background: #6A82FB;
}

.dwnCard{
  display: none;
  margin-top: 20px;
  padding: 12px;
  background: #001f3f;
  border: none;
  border-radius: 10px;
  color: white;
  font-size: 1em;
  cursor: pointer;
  transition: background 0.3s;
}

@media (max-width: 600px) {
  .section {
      padding: 20px;
      max-width: 90%;
  }

  h1 {
      font-size: 1.5em;
  }

  button {
      padding: 10px;
      font-size: 0.9em;
  }

  input[type="text"],
  select {
      font-size: 0.9em;
      padding: 8px;
  }
}

.idCard {
  width: 280px;
  border-radius: 10px;
  box-shadow: 0 4px 8px rgba(0, 0, 0, 0.2);
  overflow: hidden;
  background-color: #fff;
  text-align: center;
  font-family: 'Poppins', Arial, sans-serif;
  display: none;
}

.idCard-header {
background-color: #001f3f;
background: linear-gradient(315deg, #313c47, #001f3f);
padding: 20px;
color: white;
position: relative;
overflow: hidden;
}

.idCard-header::after {
content: '';
position: absolute;
top: -4px;
left: -20px;
width: 40%;
height: 180%;
background: radial-gradient(circle, rgba(255, 255, 255, 0.4) 30%, transparent 10.01%);
background-size: 10px 10px;
transform: rotate(52deg);
opacity: 0.8;
}

.idCard-header::before {
content: '';
position: absolute;
background-color: #fff;
width: 12px;
height: 12px;
border-radius: 20px;
top: 5px;
left: 50%;
transform: translateX(-50%);
}

.idCard-header h1 {
  margin: 0;
  font-size: 18px;
}

.idCard-body {
  padding: 20px;
  display: flex;
  flex-direction: column;
}

.idCard-body h2 {
  margin: 0;
  font-size: 22px;
  color: #333;
}

.idCard-body p {
  font-size: 14px;
  margin: 0;
  color: #777;
  font-weight: 600;
}

.idCard-body h3 {
  color: #1d72b8;
  font-size: 11px;
  margin: 0;
}

.idCard-qr {
  margin: 20px 0;
}

.idCard-footer {
  background-color: #007bff;
  color: white;
  padding: 15px;
}

.idCard-footer p {
  margin: 0;
  font-size: 16px;
  font-weight: bold;
}- JavaScript
In script.js, implement the JavaScript logic for QR code generator and download functionality. Use a QR code library to dynamically generate a QR code from the user’s input data. Attach an event listener to the download button so users can save the generated ID card as a file.
ID Card Generation and Download Workflow
1. DOM Element initialization
- Retrieve the form element using the idForm ID and assign it to the idForm variable.
- Retrieve the download button using the dwnCard ID and assign it to the dwnCard variable.
2. Form Submission Processing
- Attach a submit event listener to the form to handle user input and ID card generation
- Invoke event.preventDefault() to suppress the default form submission behavior and prevent page reloads.
3. Form Data Collection
- Hide the form container by setting its display property to none.
- Extract and store the values entered into the form fields for further processing.
4. Unique ID Card Generation
- Generate a unique identifier by concatenating the ID prefix with a randomly generated 4-digit number.
- Ensure the generated ID follows a consistent format for all ids.
5. ID information Rendering
- Use jQuery to dynamically populate the id elements with the collected user data.
- Update the id fields, including the generated unique ID, to reflect the submitted information.
6. QR Code Generation
- Clear any previously rendered QR code to avoid duplicate output.
- Generate a new QR code containing the Id details using the configured QR code library.
- Render the QR code within the designated container on the id.
7. ID Card Display and Download Enablement
- Make the generated id visible to the user.
- Display and enable the download button once id generation is complete.
8. ID Card Export Functionality
- Attach a click event listener to the download button.
- Use the htmlToImage library link, assign the generated image as its source, and trigger a programmatic click to initiate the file download.
9. ID information Rendering
- Use jQuery to dynamically populate the id elements with the collected user data.
- Update the id fields, including the generated unique ID, to reflect the submitted information.
10. Error Handling
- Capture and log any errors encountered during the image conversation or download process.
- Provide debugging information through the browser console to assist with troubleshooting.
const idForm = document.getElementById('idForm');
const downloadCard = document.getElementById('dwnCard');

idForm.addEventListener('submit', function (event) {
  event.preventDefault();

  const formcontainer = document.getElementById('formContainer')
  formcontainer.style.display = 'none';
  const eventTitle = document.getElementById('eventTitle').value;
  const participant = document.getElementById('participant').value;
  const designation = document.getElementById('designation').value;
  const company = "@" + document.getElementById('company').value;
  const rights = document.getElementById('rights').value;

  const id = 'ID' + Math.floor(Math.random() * 10000).toString().padStart(4, '0');

  $('#idEvent').text(eventTitle);
  $('#idName').text(participant);
  $('#idDesignation').text(designation);
  $('#idcontainer').text(company);
  $('#idRights').text(rights);

  $('#qrcode').empty();

  $('#qrcode').qrcode({
    text: `ID: ${id}\Event: ${eventTitle}\nName: ${participant}\nDesignation: ${designation}\nCompany: ${company}\nAccess: ${rights}`,
    width: 128,
    height: 128
  });

  $('#idCard').css('display', 'block');
  $('#dwnCard').css('display', 'block');
});

downloadCard.addEventListener('click', function (e) {
  e.preventDefault();
  const idcardElement = document.getElementById('idCard');
  htmlToImage.toPng(idcardElement)
    .then(function (dataUrl) {
      const link = document.createElement('a');
      link.download = 'card.png';
      link.href = dataUrl;
      link.click();
    })
    .catch(function (error) {
      console.error('Error converting HTML to image:', error);
    });
});
Conclusion & Final Thoughts - ID Card with QR Code
Developing an ID card generator using HTML, CSS, and JavaScript is an excellent way to strengthen your front-end development skills while creating a practical and interface application. By implementing the concepts in this guide, you can build a fully functional solution that supports features such as QR code generator and ID card you downloading. This project serves as a strong foundation for future customization, allowing you to enhance the design, add advanced functionality, and tailor the generator to meet specific requirements.