

Random Number Generator with HTML CSS and JavaScript
Discover how to use HTML, CSS, and JavaScript to generate random numbers between specific values. This detailed tutorial demonstrates how to use a latest user interface to develop a random number generator.
What is a Random Numbers Generator?
Random Number Generators are quiet yet powerful tools that supports numerous systems we depend on daily. Whether you are encrypting a message on WhatsApp, engaging in an online game, or participating in a lucky draw, there’s an RNG functioning in the background to maintain fairness and unpredictability. As technology advances, so too will the techniques for generating randomness, safeguarding a secure and equitable digital future.
In web development, random numbers generator is a crucial task, particularly for apps, games, and quizzes. You can make a straightforward yet eye-catching random number generator with HTML CSS and JavaScript.
Let’s make sure you have all the information you need before we begin.
- A basic understanding of HTML is necessary to create the web page’s structure.
- Basic CSS knowledge: To style and improve the appearance of the page.
- Fundamental understanding of JavaScript: to give the random number generator more capabilities.
- HTML CODE
Initially, we’ll establish the fundamental layout of the page utilizing HTML. We require a little section to showcase the random number, and a button to trigger its generation. Let’s dissect into step by step.
(a) <!DOCTYPE html> :
This indicates the document type as HTML5, allowing the browser to understand how to display the page.
(b) <html lang = “en”> :
This represents the opening tag for the HTML document. The ‘lang = “en”‘ indicates that the page’s language is English.
(c) <Head> :
This portion includes metadata and connections to external resources.
Within the head tag:
- <meta charset=”utf-8″> : This establishes the character encoding for the document, ensures that characters are displayed correctly.
- <meta name=”view port” content=”width=device-width, initial-scale=1.0″> : Guarantees that the page is responsive, adjusting to various screen sizes (particularly crucial for mobile devices).
- <title>Random Number Generator</title>: This defines the title of the webpage, which is shown in the browser tab.
- <link rel=”stylesheet” href=”styles.css”> : External CSS file (styles.css) connection for styling the page.
- <link href=”https://fonts.google….t, rel=”stylesheet”> : Poppins font, imports from Google Fonts.
(d) <Body> :
This portion includes the content visibility of the webpage
Within the body tag:
- <div class=”section”> : A section div that encompasses all the primary content for the Random number generator.
Inside the section:
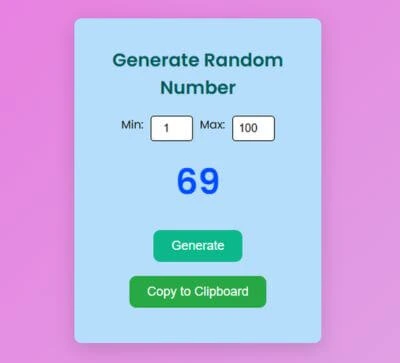
- <h1>Random Number Generator</h1> : This shows the title header as “Random Number Generator”.
- <div class=”inputRange”> : A div that contains input fields for defining the specific range between random number.
Within this div:
- <label for=”min”>Min: </label> : A label for the input of minimum number.
- <input type=”number” id=”min” placeholder=”1″ value=”1″> : An input to indicate the minimum number, with a default value of 1.
- <label for=”max”>Max : </label> : A label for the input of the maximum number.
- <input type=”number” id=”max” placeholder=”100″ id=”100″> : An input field to indicate maximum number, with a default value of 100.
- <div class=”randomNumber” id=”randomNumber”>0</div> : A div that presents the generated random number, beginning with 0 as the initial value.
- <button id=”genButton”>Generate</button> : A button that initiates the generation of a random number.
- <button id=”copyButton”>Copy to Clipboard</button> : That copies the generated random number to the clipboard once button is triggered.
(e) <script src=”script.js”></script> :
The algorithm for creating random numbers and copying them to clipboard is contained in an external JavaScript file that is linked to here.
<!DOCTYPE html>
<html lang="en">
<head>
  <meta charset="UTF-8">
  <meta name="viewport" content="width=device-width, initial-scale=1.0">
  <title>Random Number Generator | Coding Jasim</title>
  <link rel="stylesheet" href="styles.css">
  <link href="https://fonts.googleapis.com/css2?family=Poppins:wght@400;600&display=swap" rel="stylesheet">
</head>
<body>
  <div class="section">
    <h1>Generate Random Number</h1>
    <div class="inputRange">
      <label for="min">Min: </label>
      <input type="number" id="min" placeholder="1" value="1">
      <label for="max">Max: </label>
      <input type="number" id="max" placeholder="100" value="100">
    </div>
    <div class="randomNumber" id="randomNumber">0</div>
    <button id="genButton">Generate</button>
    <button id="copyButton">Copy to Clipboard</button>
  </div>
  <script src="script.js"></script>
</body>
</html>- CSS CODE
Subsequently, we’ll incorporate some CSS to enhance the appearance of the interface, giving it a tidy and modern feel.
* {
  margin: 0;
  padding: 0;
  box-sizing: border-box;
}

body {
  font-family: 'Poppins', sans-serif;
  background: linear-gradient(135deg, #eb74df 0%, #ddace5 100%);
  display: flex;
  justify-content: center;
  align-items: center;
  height: 100vh;
}

.section {
  background-color: rgb(182, 221, 252);
  padding: 40px;
  border-radius: 10px;
  box-shadow: 0 8px 30px rgba(0, 0, 0, 0.15);
  text-align: center;
  width: 350px;
}

h1 {
  margin-bottom: 20px;
  font-size: 26px;
  font-weight: 600;
  color: #035c59;
}

.inputRange {
  display: flex;
  justify-content: center;
  gap: 10px;
  margin-bottom: 20px;
}

.inputRange label {
  font-size: 16px;
  font-weight: 500;
  color: #101010;
}

.inputRange input {
  width: 60px;
  padding: 8px;
  border-radius: 5px;
  border: 1px solid #060505;
  font-size: 16px;
  text-align: center;
}

.randomNumber {
  font-size: 50px;
  /*color: #007bff;*/
  color: #004cff;
  margin-bottom: 20px;
  font-weight: 600;
  transition: transform 0.3s ease;
}

button {
  /*background-color: #007bff;*/
  background-color: #0cb78a;
  color: white;
  padding: 12px 25px;
  border: none;
  border-radius: 10px;
  cursor: pointer;
  font-size: 18px;
  margin: 10px 0;
  transition: background-color 0.3s ease, transform 0.3s ease;
}

button:hover {
  background-color: #267d83;
  transform: scale(1.05);
}

#copyButton {
  background-color: #28a745;
}

#copyButton:hover {
  background-color: #212b88;
}

@media (max-width: 400px) {
  .section {
    width: 100%;
    padding: 20px;
  }

  .randomNumber {
    font-size: 40px;
  }

  button {
    font-size: 16px;
  }
}- JavaScript
Lastly, we’ll implement JavaScript to enable the functionality of random number generation. This is a thorough explanation of how it operates:
(a) Event Listener for ‘Generate’ button
document.getElementById('genButton').addEventListener('click', function() {
  const min = parseInt(document.getElementById('min').value) || 1;
  const max = parseInt(document.getElementById('max').value) || 100;

  const randomNumber = Math.floor(Math.random() * (max - min + 1)) + min;

  const numberDisplay = document.getElementById('randomNumber');
  numberDisplay.innerText = randomNumber;

  numberDisplay.style.transform = 'scale(1.2)';
  setTimeout(() => {
    numberDisplay.style.transform = 'scale(1)';
  }, 300);
});- Button Click Event : The code listens for the element with the ID genButton to be clicked, the associated function is activated.
- Obtaining Min and Max Values : The input fields with the IDs min and max are used to extract min and max valued. If no values are supplied then default values are utilized as 1 for min and 100 for max. Also the input fields’ string values are converted to integers using parseInt() function.
- Random Number Generation :
- This formula is used to create a random number between the given min and max range:
Math.floor(Math.random() * (max - min + 1)) + min;- The decimal produced by Math.random() ranges from 0 to 1.
- To get the necessary range, scale this using Math.random() * (max – min + 1).
- The number is rounded to the closest integer using Math.floor().
- Lastly, the range is shifted to begin at min by using + min.
4. Showing the Random Number:
- The innerText of the element with the ID randomNumber is set to the created number in order to display the randomly generated number.
5. Number Scaling Animation:
- A scale(1.2) transform is applied to momentarily increase the number’s size, makes the impression that is larger.
- The integer returns to its initial size when the scale is reset to 1 after 300 milliseconds (using setTimeout). When a new number is generated, this produces a basic “bounce” effect.
(b) ‘Copy’ Button Event Listener
document.getElementById('copyButton').addEventListener('click', function() {
  const randomNumber = document.getElementById('randomNumber').innerText;

  // Create a temporary input element to copy the number
  const tempInput = document.createElement('input');
  document.body.appendChild(tempInput);
  tempInput.value = randomNumber;
  tempInput.select();
  document.execCommand('copy');
  document.body.removeChild(tempInput);

  // Change button text temporarily
  const copyButton = document.getElementById('copyButton');
  copyButton.innerText = 'Copied!';
  setTimeout(() => {
    copyButton.innerText = 'Copy to Clipboard';
  }, 2000);
});
Detailed Description:
1. Button Click Event:
- This code listens for the element with the ID copyButton to be clicked. The function is carried out when the button is pressed.
2. Retrieve the Random Number:
- The innerText of the element with ID randomNumber contains the current random number (from the previous generation).
3. Copy the Number to the Clipboard:
- An input element is created temporarily by using document.createElement(‘input’).
- Using appenChild() to add this temporary input to the DOM (document body).
- The value of the input element is assigned a random number.
- The select() method is utilized to highlight the text within the input field, after which document.execCommand(‘copy’) copies the selected text to the clipboard.
- Following the copying of the number, the temporary input element is eliminated from the DOM through removeChild().
4. Alter Button Text:
- After the number has been copied, the button’s text is temporarily changed to “Copied” to provide feedback to user.
- After a duration of seconds (2000 milliseconds), the button text is reverted to “Copy to Clipboard” using setTimeout().
document.getElementById('genButton').addEventListener('click', function() {
  const min = parseInt(document.getElementById('min').value) || 1;
  const max = parseInt(document.getElementById('max').value) || 100;

  const randomNumber = Math.floor(Math.random() * (max - min + 1)) + min;

  const numberDisplay = document.getElementById('randomNumber');
  numberDisplay.innerText = randomNumber;

  numberDisplay.style.transform = 'scale(1.2)';
  setTimeout(() => {
    numberDisplay.style.transform = 'scale(1)';
  }, 300);
});

document.getElementById('copyButton').addEventListener('click', function() {
  const randomNumber = document.getElementById('randomNumber').innerText;

  const tempInput = document.createElement('input');
  document.body.appendChild(tempInput);
  tempInput.value = randomNumber;
  tempInput.select();
  document.execCommand('copy');
  document.body.removeChild(tempInput);

  const copyButton = document.getElementById('copyButton');
  copyButton.innerText = 'Copied!';
  setTimeout(() => {
    copyButton.innerText = 'Copy to Clipboard';
  }, 2000);
});
Conclusion & Final Thoughts
You know possess the knowledge to design a basic, modern random number generator utilizing HTML, CSS, and JavaScript. Whether you’re designing a game, a quiz, or any other application, this is an excellent future to incorporate. Additionally, with the capacity to style the UI and introduce dynamic elements such as number ranges or clipboard copying, you can enhance its utility for your users.
If you encounter any problem while creating this project, you can download the source code files for free by clicking the download button. You can also view a live demo of this project by clicking the Demo button.