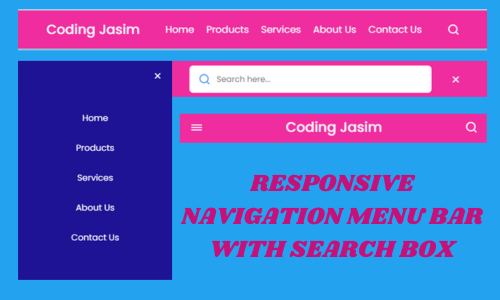
Navigation menu is standard interface of almost every website’s Front page. It’s contains a row of words or icons horizontally aligned one by one at the top (or sometimes on the side) of your screen, which help users to find your way around websites with different aspects.
Hello everyone, now you will learn how to create a Responsive Navigation menu bar in HTML CSS and JavaScript. It helps you to find with some specific information or features like ‘user-selected mode will not be change when the page is refreshed’.
Let’s have a gentle look at the above depicted image, which represents our navigation menu bar on top side of the page. On the right side we can see a logo, and in the center some navigation links aligned one by one, and a search bar toggle button appear and disappear by clicking on the left side.
Now let’s start with the code, before that you have to create a folder with unique name where we have placed all these codes such as index.html, style.css, and script.js.
First, create your structural part as index.html file, then placed/copy the below code inside it to achieve your page structure design.
<!DOCTYPE html>
<!-- Coding by Coding Jasim | www.codingjasimweb.com-->
<html lang="en">
  <head>
    <meta charset="UTF-8" />
    <meta http-equiv="X-UA-Compatible" content="IE=edge" />
    <meta name="viewport" content="width=device-width, initial-scale=1.0" />
    <title>Navigation Bar with Search Box</title>
    <!-- For CSS -->
    <link rel="stylesheet" href="style.css" />
    <!-- Unicons CSS -->
    <link rel="stylesheet" href="https://unicons.iconscout.com/release/v4.0.0/css/line.css" />
    <script src="script.js" defer></script>
  </head>
  <body>
    <nav class="nav">
      <i class="uil uil-bars navOpenBtn"></i>
      <a href="#" class="logo">Coding Jasim</a>

      <ul class="nav-links">
        <i class="uil uil-times navCloseBtn"></i>
        <li><a href="#">Home</a></li>
        <li><a href="#">Products</a></li>
        <li><a href="#">Services</a></li>
        <li><a href="#">About Us</a></li>
        <li><a href="#">Contact Us</a></li>
      </ul>

      <i class="uil uil-search search-icon" id="searchIcon"></i>
      <div class="search-box">
        <i class="uil uil-search search-icon"></i>
        <input type="text" placeholder="Search here..." />
      </div>
    </nav>
  </body>
</html>
Second step, you have to decorate the structure by creating a file style.css, then placed the below code inside it and also you can experiment with your own design like color, fonts, size, and more.
/* Google Fonts - Poppins */
@import url("https://fonts.googleapis.com/css2?family=Poppins:wght@300;400;500;600&display=swap");

* {
  margin: 0;
  padding: 0;
  box-sizing: border-box;
  font-family: "Poppins", sans-serif;
}
body {
  background: #ade0f9;
}
.nav {
  position: fixed;
  top: 0;
  left: 0;
  width: 100%;
  padding: 15px 200px;
  background: #f02d9f;
  box-shadow: 0 4px 10px rgba(0, 0, 0, 0.2);
}
.nav,
.nav .nav-links {
  display: flex;
  align-items: center;
}
.nav {
  justify-content: space-between;
}
a {
  color: #fff;
  text-decoration: none;
}
.nav .logo {
  font-size: 22px;
  font-weight: 500;
}
.nav .nav-links {
  column-gap: 20px;
  list-style: none;
}
.nav .nav-links a {
  transition: all 0.2s linear;
}
.nav.openSearch .nav-links a {
  opacity: 0;
  pointer-events: none;
}
.nav .search-icon {
  color: #fff;
  font-size: 20px;
  cursor: pointer;
}
.nav .search-box {
  position: absolute;
  right: 250px;
  height: 45px;
  max-width: 555px;
  width: 100%;
  opacity: 0;
  pointer-events: none;
  transition: all 0.2s linear;
}
.nav.openSearch .search-box {
  opacity: 1;
  pointer-events: auto;
}
.search-box .search-icon {
  position: absolute;
  left: 15px;
  top: 50%;
  left: 15px;
  color: #4a98f7;
  transform: translateY(-50%);
}
.search-box input {
  height: 100%;
  width: 100%;
  border: none;
  outline: none;
  border-radius: 6px;
  background-color: #fff;
  padding: 0 15px 0 45px;
}

.nav .navOpenBtn,
.nav .navCloseBtn {
  display: none;
}

/* responsive */
@media screen and (max-width: 1160px) {
  .nav {
    padding: 15px 100px;
  }
  .nav .search-box {
    right: 150px;
  }
}
@media screen and (max-width: 950px) {
  .nav {
    padding: 15px 50px;
  }
  .nav .search-box {
    right: 100px;
    max-width: 400px;
  }
}
@media screen and (max-width: 768px) {
  .nav .navOpenBtn,
  .nav .navCloseBtn {
    display: block;
  }
  .nav {
    padding: 15px 20px;
  }
  .nav .nav-links {
    position: fixed;
    top: 0;
    left: -100%;
    height: 100%;
    max-width: 290px;
    width: 100%;
    padding-top: 100px;
    row-gap: 30px;
    flex-direction: column;
    background-color: #1e1394;
    box-shadow: 0 2px 10px rgba(0, 0, 0, 0.1);
    transition: all 0.4s ease;
    z-index: 100;
  }
  .nav.openNav .nav-links {
    left: 0;
  }
  .nav .navOpenBtn {
    color: #fff;
    font-size: 20px;
    cursor: pointer;
  }
  .nav .navCloseBtn {
    position: absolute;
    top: 20px;
    right: 20px;
    color: #fff;
    font-size: 20px;
    cursor: pointer;
  }
  .nav .search-box {
    top: calc(100% + 10px);
    max-width: calc(100% - 20px);
    right: 50%;
    transform: translateX(50%);
    box-shadow: 0 2px 10px rgba(0, 0, 0, 0.1);
  }
}
Finally, you have to create a file called script.js, for interactive actions over structural design such as when you click on search button it appear/disappear and more.
const Nav = document.querySelector(".nav"),
  searchIcon = document.querySelector("#searchIcon"),
  NavOpenBtn = document.querySelector(".navOpenBtn"),
  NavCloseBtn = document.querySelector(".navCloseBtn");

searchIcon.addEventListener("click", () => {
  Nav.classList.toggle("openSearch");
  Nav.classList.remove("openNav");
  if (Nav.classList.contains("openSearch")) {
    return searchIcon.classList.replace("uil-search", "uil-times");
  }
  searchIcon.classList.replace("uil-times", "uil-search");
});

NavOpenBtn.addEventListener("click", () => {
  Nav.classList.add("openNav");
  Nav.classList.remove("openSearch");
  searchIcon.classList.replace("uil-times", "uil-search");
});
NavCloseBtn.addEventListener("click", () => {
  Nav.classList.remove("openNav");
});
While creating code, If you encounter with any difficulties or issues, then you can download this navbar source code for free by clicking the below download button.

Pingback: A Website with Login and Signup form in HTML CSS & JavaScript – Coding Jasim