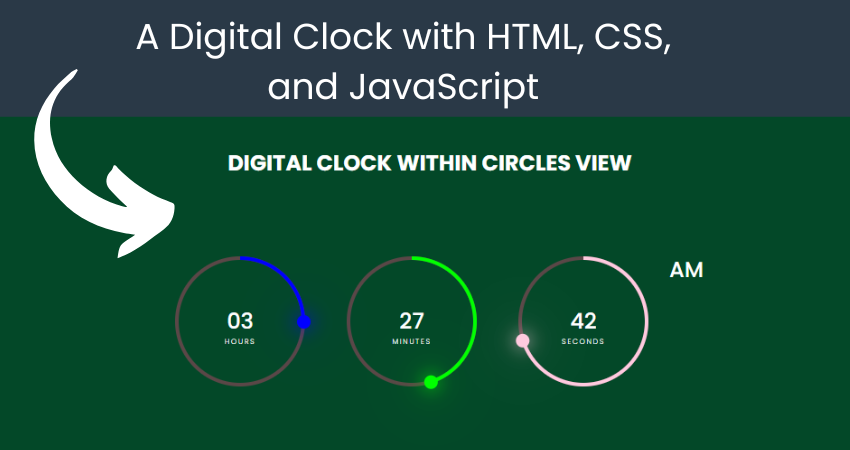
Learn HTML, CSS, and JavaScript by constructing a digital clock from scratch. This comprehensive guide is designed for starter to grasp the fundamentals of coding and web development.
A digital clock is one that presents time in numerical form. JavaScript is used to fetch real-time data from your device and render it on the website. This article delves into the process of how JavaScript acquires time and shows it through simple techniques. Essentially, this is a digital clock that allows you to view time in numerical format, including hours, minutes, and seconds. Typically, the clock operates continuously, eliminating the need to refresh the website to see latest time.
Requirements: Before beginning this tutorial, it’s essential to have a fundamental grasp of HTML, CSS, and JavaScript. Additionally, you’ll require a code editor like Visual Studio Code or Sublime Text for coding and saving your work.
HTML CODE
To commence, we’ll first need to draft a simple HTML document. Within this document, we’ll outline the framework for our digital clock.
Once created, then copy and paste the following code snippets into your document. Ensure to save your HTML file with a .html extension to ensure it’s correctly displayed in a web browser.
<!DOCTYPE html>
<html lang="en">
<head>
    <meta charset="UTF-8">
    <meta http-equiv="X-UA-Compatible" content="IE=edge">
    <meta name="viewport" content="width=device-width, initial-scale=1.0">
    <title>Digital Clock | By Coding Jasim</title>
    <link rel="stylesheet" href="styles.css">
    <script type="text/javascript" src="script.js"></script>
</head>
<body>
  <div class="container">
    <div class="heading">
      <h2>Digital clock within Circles View</h2>
    </div>
    <div id="time">
      <div class="circle" style="--color: #0000ff">
        <div class="dots h_dot"></div>
        <!--SVG (Scalable Vector Graphics) element used to draw circles-->
        <svg>
          <circle cx="70" cy="70" r="70"></circle>
          <circle cx="70" cy="70" r="70" id="hh"></circle>
        </svg>
        <div id="hours">00</div>
      </div>
      <div class="circle" style="--color: #00ff00">
        <div class="dots m_dot"></div>
        <svg>
          <circle cx="70" cy="70" r="70"></circle>
          <circle cx="70" cy="70" r="70" id="mm"></circle>
        </svg>
        <div id="minutes">00</div>
      </div>
      <div class="circle" style="--color: #ffcadf">
        <div class="dots s_dot"></div>
        <svg>
          <circle cx="70" cy="70" r="70"></circle>
          <circle cx="70" cy="70" r="70" id="ss"></circle>
        </svg>
        <div id="seconds">00</div>
      </div>

      <div class="ap">
        <div id="ampm">AM</div>
      </div>
    </div>
  </div>

</body>
</html>
CSS Code
After setting up the fundamental HTML framework for the digital clock, the subsequent phase involves incorporating design elements using CSS. CSS empowers us to manage the visual aspects of the clock, including its layout, color scheme, and font style.
Following that, we’ll develop our CSS document. Within this document, we’ll apply some fundamental CSS principles to craft our digital clock. Additionally, we’ll introduce padding and margin settings to guarantee the design is accurate.
This process will enhance the visual appeal of our digital clock. Name your CSS document styles.css and insert the provided codes into it. Ensure the file ends with .css.
@import url('https://fonts.googleapis.com/css2?family=Poppins:wght@100;300;400;500;600;700;800;900&display=swap');

* {
  margin: 0;
  padding: 0;
  box-sizing: border-box;
  font-family: 'Poppins', sans-serif;
}

.heading {
  position: absolute;
  margin-bottom: 350px;
  justify-content: center;
  align-items: center;
  color: #fff;
  text-transform: uppercase;
}

.container {
  width: 100%;
  min-height: 100vh;
  display: flex;
  justify-content: center;
  align-items: center;
  background: #034828;
}

#time {
  display: flex;
  gap: 40px;
  color: #fff;
}

#time .circle {
  position: relative;
  width: 150px;
  height: 150px;
  display: flex;
  justify-content: center;
  align-items: center;
}

#time .circle svg {
  position: relative;
  width: 150px;
  height: 150px;
  transform: rotate(270deg);
}

#time .circle svg circle {
  width: 100%;
  height: 100%;
  fill: transparent;
  stroke: #5a4747;
  stroke-width: 4px;
  transform: translate(5px, 5px);
}

#time .circle svg circle:nth-child(2) {
  stroke: var(--color);
  stroke-dasharray: 440;
}

#time div {
  position: absolute;
  text-align: center;
  font-size: 1.5rem;
  font-weight: 500;
}

#time div span {
  position: absolute;
  transform: translate(-50%, 0px);
  font-size: 0.5rem;
  font-weight: 300;
  letter-spacing: 0.1rem;
  text-transform: uppercase;
}

#time .ap {
  position: relative;
  font-size: 1rem;
  transform: translate(-20px);
}

.dots {
  position: absolute;
  width: 100%;
  height: 100%;
  display: flex;
  justify-content: center;
  z-index: 10;
}

.dots::before {
  content: '';
  position: absolute;
  top: -3px;
  width: 15px;
  height: 15px;
  background: var(--color);
  border-radius: 50%;
  box-shadow: 0 0 20px var(--color), 0 0 60px var(--color  );
}
JavaScript Code
In the end, we must enable the functionality of our clock by integrating JavaScript. Create a JavaScript document named script.js and insert the provided codes into it. Ensure it’s properly linked to your HTML document, enabling the execution of the scripts on the page. Remember, the file must have .js extension at the end.
setInterval(() => {
  // getting time indicator elements
  let hours = document.getElementById('hours');
  let minutes = document.getElementById('minutes');
  let secondes = document.getElementById('seconds');
  let ampm = document.getElementById('ampm');

  // time indicator digits
  let hh = document.getElementById('hh');
  let mm = document.getElementById('mm');
  let ss = document.getElementById('ss');

  // time indicator dot
  let dotH = document.querySelector('.h_dot');
  let dotM = document.querySelector('.m_dot');
  let dotS = document.querySelector('.s_dot');

  // getting current time
  let h = new Date().getHours();
  let m = new Date().getMinutes();
  let s = new Date().getSeconds();
  let ap = h >= 12 ? 'PM' : 'AM';

  // 12 hour format conversion
  if (h > 12) {
    h = h - 12;
  }

  // include 0 before single digit
  h = h < 10 ? '0' + h : h;
  m = m < 10 ? '0' + m : m;
  s = s < 10 ? '0' + s : s;

  // set time and duration label
  hours.innerHTML = h + '<br /><span>Hours</span>';
  minutes.innerHTML = m + '<br /><span>Minutes</span>';
  secondes.innerHTML = s + '<br /><span>Seconds</span>';
  ampm.innerHTML = ap;

  // set time circular indicator
  hh.style.strokeDashoffset = 440 - (440 * h) / 12;
  mm.style.strokeDashoffset = 440 - (440 * m) / 60;
  ss.style.strokeDashoffset = 440 - (440 * s) / 60;

  // set dot time position indicator
  dotH.style.transform = `rotate(${h * 30}deg)`;
  dotM.style.transform = `rotate(${m * 6}deg)`;
  dotS.style.transform = `rotate(${s * 6}deg)`;
}, 1000);
To sum up, we’ve mastered the creation of a digital clock from the ground up with HTML, CSS, and JavaScript. This endeavor serves as an excellent foundation for web development, reinforcing the understanding of HTML, CSS, and JavaScript. To further your web development skills, consider undertaking additional projects and exploring more resources like online courses and coding academies.


