


How to create Basic Countdown Timer with HTML, CSS, and JavaScript
Discover how to build a basic countdown timer using HTML, CSS, and JavaScript. This straightforward guide provides detailed instructions to help you design a sleek timer for your website.
A countdown timer is a straightforward yet powerful tool to keep your site’s visitors engaged. It can generate anticipation by displaying the remaining time for an event, special promotion, or product release. Incorporating a visual timer can enhance the user experience and motivate them to act before the time expires.
In this guide, we’ll lead you through the process of creating a basic countdown timer with HTML, CSS, and JavaScript. This tutorial is ideal for beginner with fundamental web development skills who wish to introduce dynamic elements to their sites. By following along, you will learn how to construct the timer’s framework, style it for a published appearance, and implement real-time functionality that updates automatically.
Advantages of utilizing a Countdown Timer
- Enhance Time Management : Assists individuals in staying organized and using their time efficiently.
- Increased Productivity : Promotes concentrated work within a designated timeframe.
- Lowered Stress : Awareness of the remaining time can reduce anxiety and assist in managing workloads.
- Increased Motivations : Watching the countdown can encourage individuals to complete tasks more effectively.
Requirements
Before you begin, ensure you have:
- A fundamental skills of HTML, CSS, and JavaScript.
- A Text editor such as VS Code or Sublime text.
- A web browser to test your work
- HTML CODE
Let’s begin by developing a countdown timer that will enhance your website’s appeal and interactivity. Create a file named index.html. This will serve as the framework for your countdown timer. It contains various tags such as document declaration of HTML5 as <!DOCTYPE html>, identification of English language as <html lang=”en”>, then <head> it holds metadata and connections for fonts, styles, and external scripts.
The below external script is used for animation on buttons (Start, Pause, and Reset) from Lordicon.
<script src=”https://cdn.lordicon.com/lordicon.js”></script>
<!DOCTYPE html>
<html lang="en">
<head>
<meta charset="UTF-8">
<meta name="viewport" content="width=device-width, initial-scale=1.0">
<title>Countdown Timer | Coding Jasim</title>
<link href="https://fonts.googleapis.com/css2?family=Orbitron:wght@400..900&display=swap" rel="stylesheet">
<link rel="stylesheet" href="https://fonts.googleapis.com/css2?family=Poppins:wght@400;500;600;700&display=swap">
<script src="https://cdn.lordicon.com/lordicon.js"></script>
<link rel="stylesheet" href="styles.css">
</head>
<body>
<div class="section">
<div class="countdown-section">
<svg class="countdown-svg" viewBox="0 0 100 100">
<defs>
<linearGradient id="gradient-warm" x1="0%" y1="0%" x2="100%" y2="100%">
<stop offset="0%" style="stop-color:rgb(13, 231, 247)"></stop>
<stop offset="100%" style="stop-color:#1f3dff"></stop>
</linearGradient>
</defs>
<circle class="countdown-circle" cx="50" cy="50" r="45"></circle>
</svg>
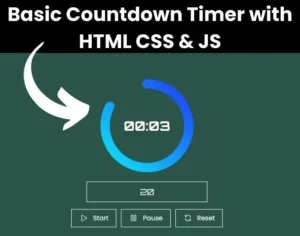
<div class="countdown-text" id="countdown">00:00</div>
</div>
<div class="controls">
<input type="number" id="timeInput" placeholder="Enter time in seconds" min="1">
<div class="buttons">
<button id="btnStart"><lord-icon
src="https://cdn.lordicon.com/aklfruoc.json"
trigger="hover"
colors="primary:#ffffff">
</lord-icon>Start</button>
<button id="btnPause"><lord-icon
src="https://cdn.lordicon.com/ptvmrrcc.json"
trigger="hover"
colors="primary:#ffffff">
</lord-icon>Pause</button>
<button id="btnReset"><lord-icon
src="https://cdn.lordicon.com/rsbokaso.json"
trigger="hover"
colors="primary:#ffffff">
</lord-icon>Reset</button>
</div>
</div>
</div>
<script src="script.js"></script>
</body>
</html>- CSS CODE
Generate a file called styles.css to enhance the appearance of your countdown timer. Below is a detailed summary of each component.
The Global Reset provided for resets default browser styles (margin and padding) to ensure consistency and applies a box-sizing of border-box for accurate width and height calculations. The font is set to Poppins, with a sans-serif fallback and the body is styled as flex container to center content both vertically and horizontally while occupying the full viewport height.
There is a section for the countdown timer and controls, which is also a flex section with column layout. The countdown timer is sized at 200px by 200px, with specific styling for its SVG elements to create an animated countdown effect using stroke properties and transitions.
The countdown time text uses the ‘Orbitron’ font, is centrally positioned within a countdown circle, and text is large, bold, white text with a 3D shadow effect. The controls, including an input field with padding and an 18px font size, are centered and occupy the full section width, while the input field has a white border and takes up 80% of the section, with a transparent background. The default focus outline is removed for a cleaner look.
When focused, the input field’s border color will change, and the placeholder text color will also change. Buttons are aligned in a row with a 10px gap, styled with ‘Poppins’ font, white text, and transparent backgrounds, featuring smooth hover transitions that change text color to black and include a sliding white background animation. Additionally, the button:active rule simulates a press effect, and ‘Lordicon’ icons within the buttons are sized at 20px by 20px.
* {
  margin: 0;
  padding: 0;
  box-sizing: border-box;
}

body {
  font-family: 'Poppins', sans-serif;
  display: flex;
  justify-content: center;
  align-items: center;
  min-height: 100vh;
  background-color: rgb(43, 83, 73);
}

.section {
  display: flex;
  flex-direction: column;
  align-items: center;
}

.countdown-section {
  position: relative;
  width: 200px;
  height: 200px;
  margin-bottom: 20px;
}

.countdown-svg {
  width: 100%;
  height: 100%;
  transform: rotate(-90deg);
}

.countdown-circle {
  fill: none;
  stroke: url(#gradient-warm);
  stroke-width: 10;
  stroke-dasharray: 282.743;
  stroke-dashoffset: 282.743;
  stroke-linecap: round;
  transition: stroke-dashoffset 1s linear;
}

.countdown-text {
  font-family: 'Orbitron', Helvetica, sans-serif;
  position: absolute;
  top: 50%;
  left: 50%;
  transform: translate(-50%, -50%);
  font-size: 28px;
  font-weight: bold;
  color: #fff;
  text-shadow: 0 2px 4px rgba(0, 0, 0, 0.2);
}

.controls {
  text-align: center;
  width: 100%;
}

input[type="number"] {
  padding: 10px;
  font-size: 18px;
  font-family: 'Orbitron', Helvetica, sans-serif;
  width: 80%;
  border: 1px solid #fff;
  margin-bottom: 15px;
  outline: none;
  text-align: center;
  background-color: transparent;
  color: white;
}

input[type="number"]:focus {
  border-color: #FFFB7D;
}

input[type="number"]::placeholder {
  color: rgb(190, 189, 189);
  opacity: 1;
}

input[type="number"]::-webkit-inner-spin-button,
input[type="number"]::-webkit-outer-spin-button {
  -webkit-appearance: none;
  margin: 0;
}

.buttons, button {
  display: flex;
  justify-content: center;
  gap: 10px;
}

button {
  position: relative;
  font-family: 'Poppins', sans-serif;
  font-size: 0.875rem;
  background-color: transparent;
  border: 1px solid #fff;
  color: #fff;
  padding: 0.5rem 1rem;
  cursor: pointer;
  transition: color 0.3s;
}

button:hover {
  color: black;
}

button lord-icon{
  width:20px;
  height:20px;
}

button::before {
  content: '';
  position: absolute;
  display: block;
  background-color: #fff;
  top: -1px;
  bottom: -1px;
  left: -1px;
  right: 100%;
  z-index: -10;
  transition: right 0.3s;
}

button:hover::before {
  right: -1px;
}

button:active {
  transform: translateY(2px);
}- JAVASCRIPT
Lastly, generate a file called script.js, to manage the countdown functionality. Below is a detailed summary explanation:
The key elements include button elements for starting, pausing, and resetting the timer identified by their IDs. Input fields allow users to enter the countdown time, while a circular progress bar visually represents the remaining time. Additional variables track the timer reference, total countdown time, remaining time, and whether the timer is paused.
The button hover effects that change the icon color on hover and reset to white on mouseout. Additionally, it feature timer functions that formatTime converts seconds to MM:SS format, and updateTimer refreshes the remaining time and update the circular stroke’s progress, using an initial circumference 282.743 for the SVG.
The timer has event listeners for starting, continuing, pausing, and resetting the countdown based on user interactions with the buttons.
const startBtn = document.getElementById('btnStart');
const pauseBtn = document.getElementById('btnPause');
const resetBtn = document.getElementById('btnReset');
const timeInput = document.getElementById('timeInput');
const countdownText = document.getElementById('countdown');
const countdownCircle = document.querySelector('.countdown-circle');

let timer;
let totalTime;
let remainingTime;
let isPaused = false;

document.querySelectorAll('.buttons button').forEach(button => {
    const icon = button.querySelector('lord-icon');
    button.addEventListener('mouseover', () => {
        icon.setAttribute('colors', 'primary:#000000');
    });

    button.addEventListener('mouseout', () => {
        icon.setAttribute('colors', 'primary:#ffffff');
    });
});

function formatTime(seconds) {
    const mins = Math.floor(seconds / 60);
    const secs = seconds % 60;
    return `${String(mins).padStart(2, '0')}:${String(secs).padStart(2, '0')}`;
}

function timerUpdate() {
    if (remainingTime <= 0) {
        clearInterval(timer);
        countdownCircle.style.strokeDashoffset = '0';
        countdownText.textContent = '00:00';
        return;
    }

    remainingTime--;
    countdownText.textContent = formatTime(remainingTime);

    const dashOffset = (282.743 * (remainingTime / totalTime)).toFixed(3);
    countdownCircle.style.strokeDashoffset = dashOffset;
}

startBtn.addEventListener('click', () => {
    if (isPaused && timer) {
        isPaused = false;
        timer = setInterval(timerUpdate, 1000);
        return;
    }

    clearInterval(timer);
    totalTime = parseInt(timeInput.value) || 0;
    remainingTime = totalTime;

    if (totalTime > 0) {
        countdownText.textContent = formatTime(totalTime);
        countdownCircle.style.strokeDashoffset = 282.743;
        timer = setInterval(timerUpdate, 1000);
    }
});

pauseBtn.addEventListener('click', () => {
    if (!isPaused) {
        clearInterval(timer);
        isPaused = true;
    }
});

resetBtn.addEventListener('click', () => {
    clearInterval(timer);
    countdownText.textContent = '00:00';
    countdownCircle.style.strokeDashoffset = 282.743;
    isPaused = false;
});
Conclusion & Final Thoughts
Developing a countdown timer with HTML, CSS, and JavaScript is a simple method to incorporate interactive elements into your website. In this tutorial, you’ve discovered how to organize your HTML for the timer’s design, style with CSS for visual appeal, and utilize JavaScript to enable real-time functionality.
Feel free to play around with various styles, colors, and formats that align with your website’s aesthetics and objectives. You might also consider adding features such as alerts or animations to enhance your timer’s interactivity. The knowledge you’ve acquired here can be utilized in numerous other web development endeavors, boosting your capability to creating engaging and user-friendly websites.
Continue to practice and test your ideas to further develop your coding abilities. With these fundamentals established, you are on the right tract to creating more sophisticated and interactive web components.